
How to build your own price monitoring tool
Computers are great at repetitive tasks. They don't get distracted, bored, or tired. Automation is how you should be approaching tedious tasks that are absolutely essential to becoming a successful business or when carrying out mundane responsibilities. Price monitoring, for example, is a practice that every company should be doing, and is a task that readily lends itself to automation.
In this tutorial, I’ll walk you through how to create your very own price scraping and monitoring tool from scratch. While I’m approaching this as a careful shopper who wants to make sure I’m getting the best price for a specific product, you could develop a similar tool to monitor your competitors using similar methods.
Why you should be monitoring competitor prices
Price monitoring is basically knowing how your competitors price their products, how your prices fit within your industry, and whether there are any fluctuations that you can take advantage of.
When it comes to mission-critical tasks like price monitoring, it’s important to ensure accuracy, obtain up-to-date information, and have the capacity for massive scale. By pricing your products perfectly, you can make sure that your competitors aren’t undercutting you, which makes you more likely to nab customers.
In our article on how web data is used by startups, Max Robinson, owner of Ace Work Gear, shared his thoughts on the importance of price monitoring:
“But it occurred to me that if you aren’t offering competitive prices, then you’re essentially throwing money down the drain. Even if you have good visibility, users will look elsewhere to buy once they’ve seen your prices.”
And that’s part of why automation is so important. You don’t want to miss sudden sales or deals from competitors that might make your offerings less desirable.
Overview
In terms of using price monitoring as a consumer, the key is to take advantage of rapid price drops so you can buy during lightning sales. For this tutorial, I used Scrapy, our open-source web scraping framework, and Scrapy Cloud, our fully-featured production environment (there’s a forever free account option). Here is the basic outline of my approach:
- Develop price crawlers and web scrapers to periodically collect prices from a list of products and online retailers.
- Build a Python script to check whether there are price drops in the most recently scraped data and then send an email alert when there are.
- Deploy the project to Scrapy Cloud and schedule periodic jobs to run the spiders and the script every X minutes.
Collecting the prices
I monitored prices from a couple of online retailers. To scrape the prices, I built one Scrapy spider for each of these. The spiders work by:
- Reading a list of product URLs from a JSON file
- Scraping the prices for the listed products
- Storing the prices in a Scrapy Cloud Collection (efficient key-value storage)#sc-pricing
Here is a sample JSON file with product URLs:
{
     "headsetlogitech": [
         "https://www.retailer1.com/pagefor-logitech-headset",
         "http://www.retailer2.com/pagefor-headset-logitech",
         "http://www.retailer3.com/pagefor-headset-log"
     ],
     "webcamlogitech": [
         "https://www.retailer1.com/pagefor-logitech-webcam",
         "http://www.retailer2.com/pagefor-webcam-logitech",
         "http://www.retailer3.com/pagefor-webcam-log"
     ]
}
If you want to monitor more retailers than the three I implemented, all you need to do is add their URLs to the JSON file and then create the requisite Scrapy spider for each website.
The spiders
If you are new to the world of Scrapy and web scraping, then I suggest that you check out this tutorial first. When building a spider, you need to pay attention to the layout of each retailer’s product page. For most of these stores, the spider code will be really straightforward, containing only the extraction logic using CSS selectors. In this case, the URLs are read during the spider's startup.
Here's an example spider for Best Buy:
class BestbuySpider(BaseSpider):
  name = "bestbuy.com"

  def parse(self, response):
    item = response.meta.get('item', {})
    item['url'] = response.url
    item['title'] = response.css(
      'div#sku-title > h1::text'
    ).extract_first().strip()
    item['price'] = float(response.css(
      'div.price-block ::attr(data-customer-price)'
    ).extract_first(default=0))
    yield item
BaseSpider contains the logic to read the URLs from the JSON file and generate requests. In addition to the spiders, I created an item pipeline to store product data in a Scrapy Cloud collection. You can check out the other spiders that I built in the project repository.
Building the price monitoring script
Now that the spiders have been built, you should start getting product prices that are then stored in a collection. To monitor price fluctuations, the next step is to build a Python script that will pull data from that collection, check if the most recent prices are the lowest in a given time span, and then send an email alert when it finds a good deal.
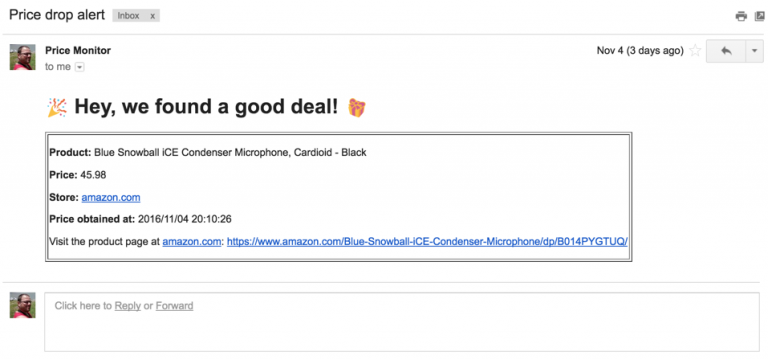
Here is my model email notification that is sent out when there's a price drop:
You can find the source code for the price monitor in the project repository. As you might have noticed, there are customizable options via command-line arguments. You can:
- modify the time frame in which the prices are compared to find out whether the latest price is the best of the day, the week, the month, and so forth.
- set a price margin to ignore insignificant price drops since some retailers have minuscule price fluctuations throughout the day. You probably don't want to receive an email when the product that you're interested in drops one cent...
Deployment and execution
Now that you have the spider(s) and the script, you need to deploy both to Scrapy Cloud, our PaaS for web crawlers.
I scheduled my spiders to collect prices every 30 minutes and the script to check this data at 30-minute intervals as well. You can configure this through your Scrapy Cloud dashboard, easily changing the periodicity depending on your needs.
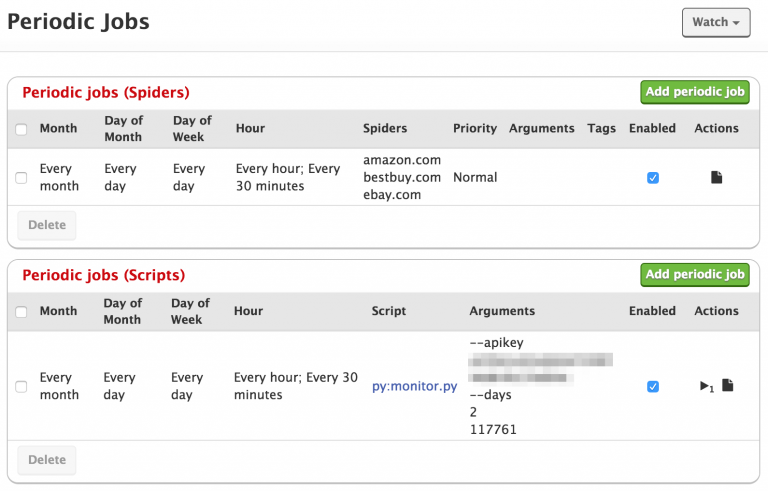
Check out this video to learn how to deploy Scrapy spiders and this tutorial on how to run a regular Python script on Scrapy Cloud.
How to run this project in your own Scrapy Cloud account:
- Clone the project:
git clone git@github.com:scrapinghub/sample-projects.git
- Add the products you want to monitor to
resources/urls.json - Sign up for Scrapy Cloud (it’s free!)
- Create a project on Scrapy Cloud
- Deploy your local project to Scrapy Cloud
- Create a periodic execution job to run each spider
- Create a periodic execution job to run the monitor script
- Sit back, relax, and let automation work its magic
Scaling up
This price monitor is a good fit for individuals interested in getting the best deals for their wishlist. However, if you’re looking to scale up and create a reliable tool for monitoring competitors, here are some typical challenges that you will face:
- Getting prices from online retailers who feature millions of products can be overwhelming. Scraping these sites requires advanced crawling strategies to ensure that you always have relevant, hot data.
- Online retailers typically have layout variations throughout their websites and the smallest shifts can bring your crawler to a screeching halt. To get around this, you might need to use advanced techniques such as machine learning to help with data discovery.
- Running into anti-bot software can shut your price-gathering activities down. You will need to develop some sophisticated techniques for bypassing these obstacles.
If you’re curious about how to implement or develop an automated price monitoring tool, feel free to reach out with any questions.
Wrap up
To sum up, there’s no reason why you should be manually searching for prices and monitoring competitors. Using Scrapy, Scrapy Cloud, a Python script, and just a little bit of programming know-how, you can easily get your holiday shopping done under budget with deals delivered straight to your inbox.
If you’re looking for a professional-grade competitor and price monitoring service, get in touch!